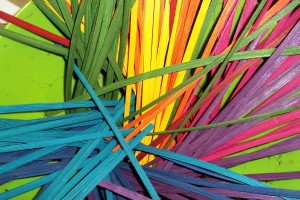
Every weaver who dyes their own reed has their own method; there really are many ways to dye reed. Some ways, of course, are more effective and produce better color and colorfastness. Last time I wrote about dyeing reed, I just talked about the product I use most often, Rit dye. Today I am going to cover dyeing terms, water and the process I use when I dye reed with Rit.
Dyeing Terms
Natural Dyes are dyes that come directly from a natural source. There are several ways to extract and use these dyes, some are safe and non toxic, some are just as poisonous and dangerous to work with as chemical dyes. If you are interested in using natural dyes you should invest in a good book about natural dyeing.
Direct Dyes are the most commonly used dyes. Reed absorbs a direct dye, so the more dye the reed absorbs, the deeper the color. Using very hot water in your dye bath helps color intensity and colorfastness, using a mordant will help color adhere to the reed. Direct Dyes are not very colorfast, they will fade over time. Rit and Comcraft are direct dyes.
Fiber Reactive Dyes cause a chemical reaction between the dye and the reed. Reactive dyes used on reed are formulated for cotton so while they are much more colorfast than direct dyes, light will cause them to fade. Pro-Chemical is a fiber reactive dye.
Mordant, also called a fixative, helps the dye adhere to the fiber/reed.
 Water
Water
Water is the main ingredient of a dyeing vat and plays a major role in dyeing. Since it is full of chemicals, getting the water as neutral as possible will improve your dyeing results. If you are not getting good dye results, use pH test paper and a water-hardness test to check your water.
Hard water – add water softener.
Alkaline water – add vinegar.
Acidic water – add clear ammonia.
and chlorinated water should sit over night in an open container so the chlorine can evaporate.
Notes:
- Since I use a direct dye, Rit, the amount water is not important, you have enough water if the reed can be submersed in it. The amount of dye, however, is crucial. I use 1 box of Rit per 2# of reed.
- Heat is an important part of direct dyes. The hotter the dye the more colorfast and the more intense the color. However boiling water can damage the reed fibers. Use high quality reed and don’t let it boil for a long time. I find bringing reed to a boil is okay, but letting it boil makes it very brittle.
- Because heat is a factor in dyeing, the cooler the water the less dye the reed will absorb. Which means if cool or just warm water is used in the dye vat, the more quickly reed will fade and bleed. It will also be rather pale in color. Sometimes pale or hint of color is the’ look’ you are after, but quickly fading, bleeding reed is always a disappointment.
- Drying reed in the sun is quick, however it also causes the color to fade very quickly and it drys the reed to the point of being brittle. If you want to dry your reed outside, find a shady spot.
- Dyeing in the kitchen is bad idea, for lots of reasons, but many of us have probably done it. However, DO NOT use cooking utensils while dyeing. Dye is poisonous.
Dyeing with Annetta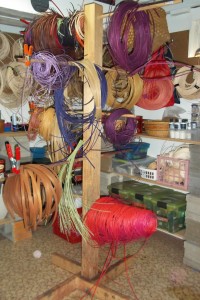
I typically use Rit Dye like this:
Tools:
Stainless Steel Pot (Many people use enamel pots, however enamel and my water don’t mix well.)
Cast Iron Hot Plate
Stainless Steel Wire Whisk
2 quart Pyrex Mixing bowl
Gloves
Hanging Rack – whatever works, you can see here the rack I use.
Process:
Bring a pot of water up to boiling. When the water is boiling, use some of it to mix the dye in a Pyrex bowl. Add it to the vat and mix well. Add the reed and make sure it is submerged. Bring the vat back up to a boil, then either remove the reed or let it set until a shade darker than wanted.
After removing the reed from the dye vat, do not rinse. While the reed is hot and steaming, hang it to dry. Keep a fan blowing on the reed and keep a dehumidifier running to help dry the air. Re-position the reed a couple times a day for a few days. When it is completely dry, rinse in ice cold water and then let it dry again. When rinsed the reed should have very little dye run off.

Sources and Resources:
My Dyeing 101 series:
For lots of great information look for a copy of “Color Control, Dyeing Reed for Basketry” by BJ Crawford. It’s out of print but you can still find it at some basket suppliers.
Hotplate – if you are going to invest, buy a good one. I went through three (burned them out!) before I just bite the bullet and bought this one. I often will dye all day long for several days at a time, this restaurant grade hotplate has held up for years.
For more information about this product, click on this link: Cadco Professional Cast Iron Range

Dye Pot – I dye a lot! and for a while I was going through cheap stainless steel pots too quickly. They would wear out, or warp. However, I have had this one for many years and it still looks new. I LOVE the heavy bottom and the glass lid.
For more information about this product click on this link: Concord Stainless Steel Tri-Ply Bottom Stockpot, 30-Quart

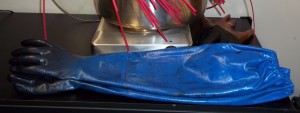
Gloves. I bought a pair of Wonder Gloves – heavy duty rubber gloves, because I reach into my pot to turn and scoop out the reed You can find them at Royalwood (click here and scroll down).
Now I know you are thinking “she’s crazy sticking her hands in boiling water” …yeah sometimes it doesn’t work out so well. After some dye leaked into my glove and burned me (ouch!) a friend sent me a pair like theses:
For more information about this product click on this link: Atlas Nitrile Elbow Length Chemical Resistant Gloves

Thanks for allowing us into your world and sharing your dye techniques. Love your colors.
Linda
Those are gorgeous colors! And thanks for sharing your techniques. I dye using hot tap water in plastic buckets. It works but I have been thinking about upgrading. Beautiful snow up here today! Loving it!
Do you dye an entire pound at a time, or do you split it up? I use a big canning pot and while a pound will fit, it doesn’t allow for much room for all the reed to absorb the color.
Hi Anne. I have a huge stainless steel stock pot and can do three pounds at a time. I open the coil and loosen it up. It doesn’t seem to need a lot of room, just make sure it’s not tightly coiled.
Do you use any specific dye to water ratio? How many boxes do you start with and do you add more dye in between batches of reed if the dye is becoming less intense?
Hi Nancy,
Since I use a direct dye, Rit, the amount water is not important, you have enough water if the reed can be submersed in it. The amount of dye, however, is crucial. I use 1 box of Rit per 2# of reed.
Sometimes I add additional dye between batches of reed. Sometimes I start over with a whole new dye pot. Depends on the color.
Thanks for sharing your dying techniques. Do you ever use Rite liquid dye? What color do you use for the beautiful red you have?
Thanks so much!
I am glad that you found my dyeing information helpful 🙂
I do use liquid Rit dye, I get the best results when I use one full bottle for four pounds of reed. The red I use most is Rit Scarlet.
You’ve given me the courage to dye my own reed. I appreciate you posting all of your dying information.
Hopefully it will turn out as good as yours! Thank you
Thank you for the simple and easy to follow instructions. I do wonder when and how much fixative do you use? I bought rit dye and fixative and I’m ready to try this.
I don’t use fixatives. I have used them and did not find that improved colorfastness.
Thank you for your excellent tutorial on dyeing reed. I have a question. I’ve used my stainless steel soup pot for dyeing with Rit dye once. Can I use this pot for food preparation again or is it to be forever relegated to reed dyeing?
Thank you.
I can’t advise you on that. I keep all of my dye pots/dishes separate from cooking pots/dishes.